Making Map Prototype - giving a life to the object (final)
Now, I'm going back to this very prototype that I started. Which is based on my frustration on Maps app that it loses locational context as soon as user starts engaging with the suggested contents. I learned how to create a map and how to create an object and make it draggable - time to connect dots.
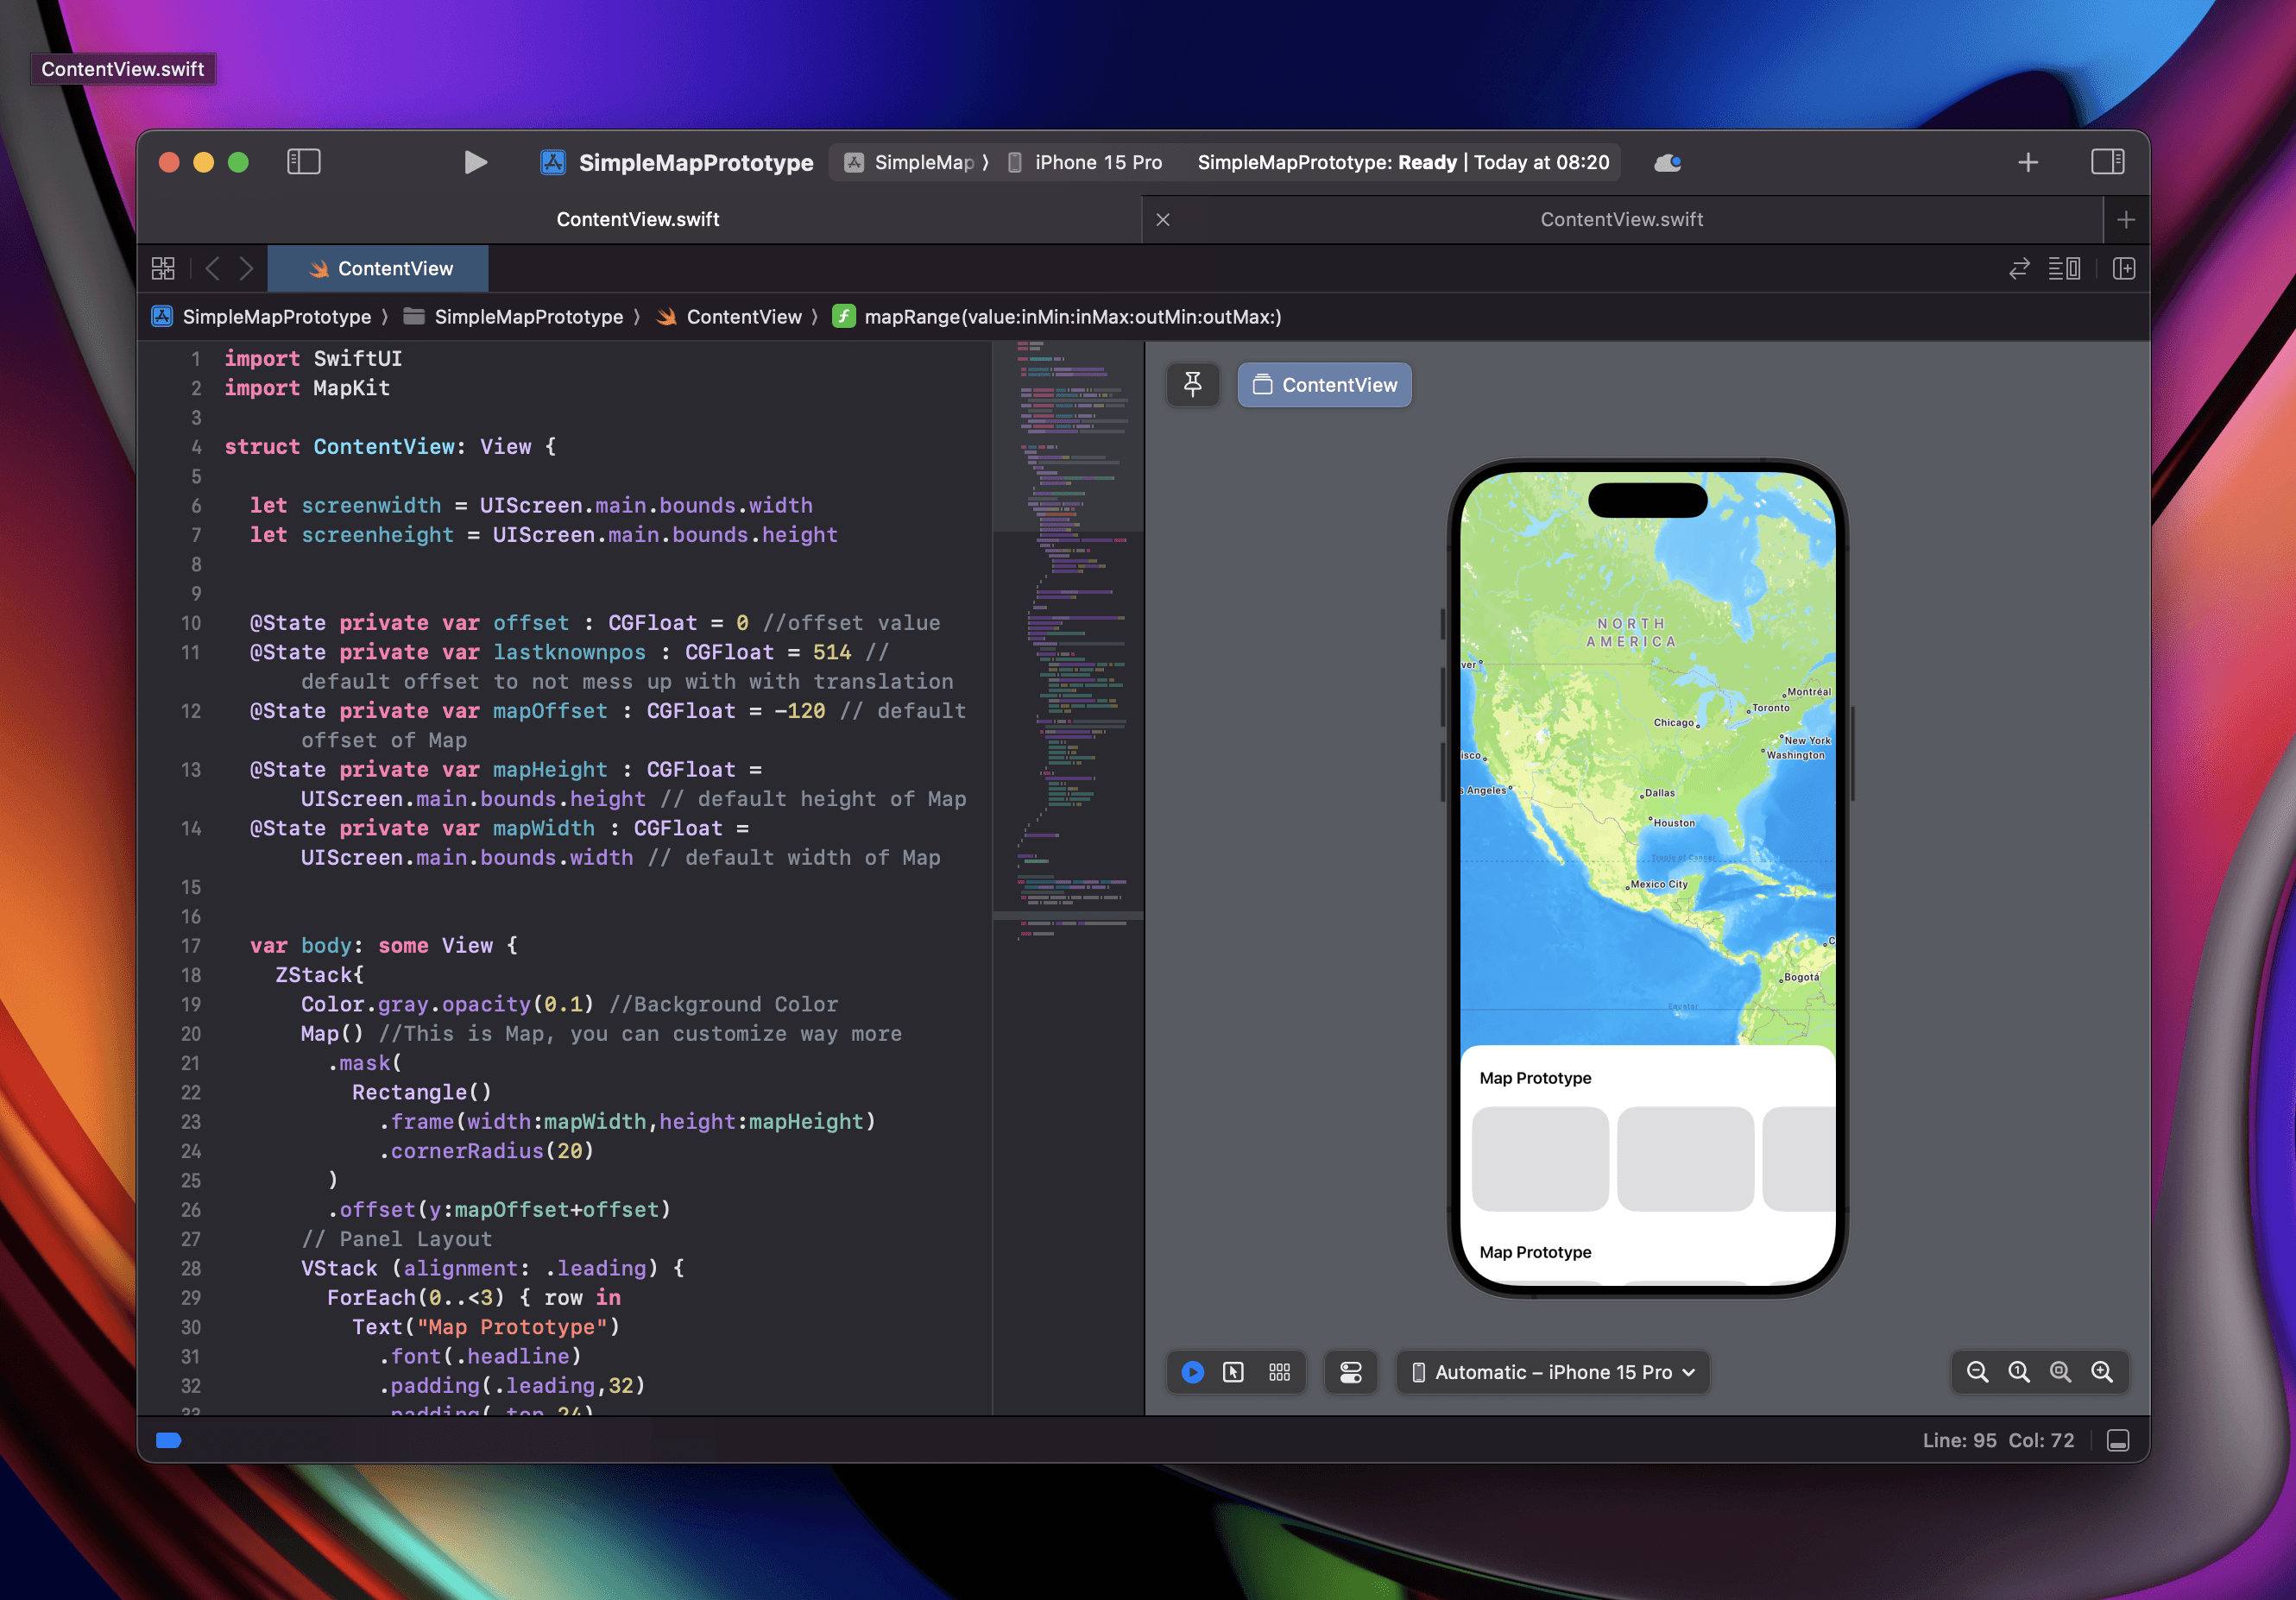
Creating Sheet
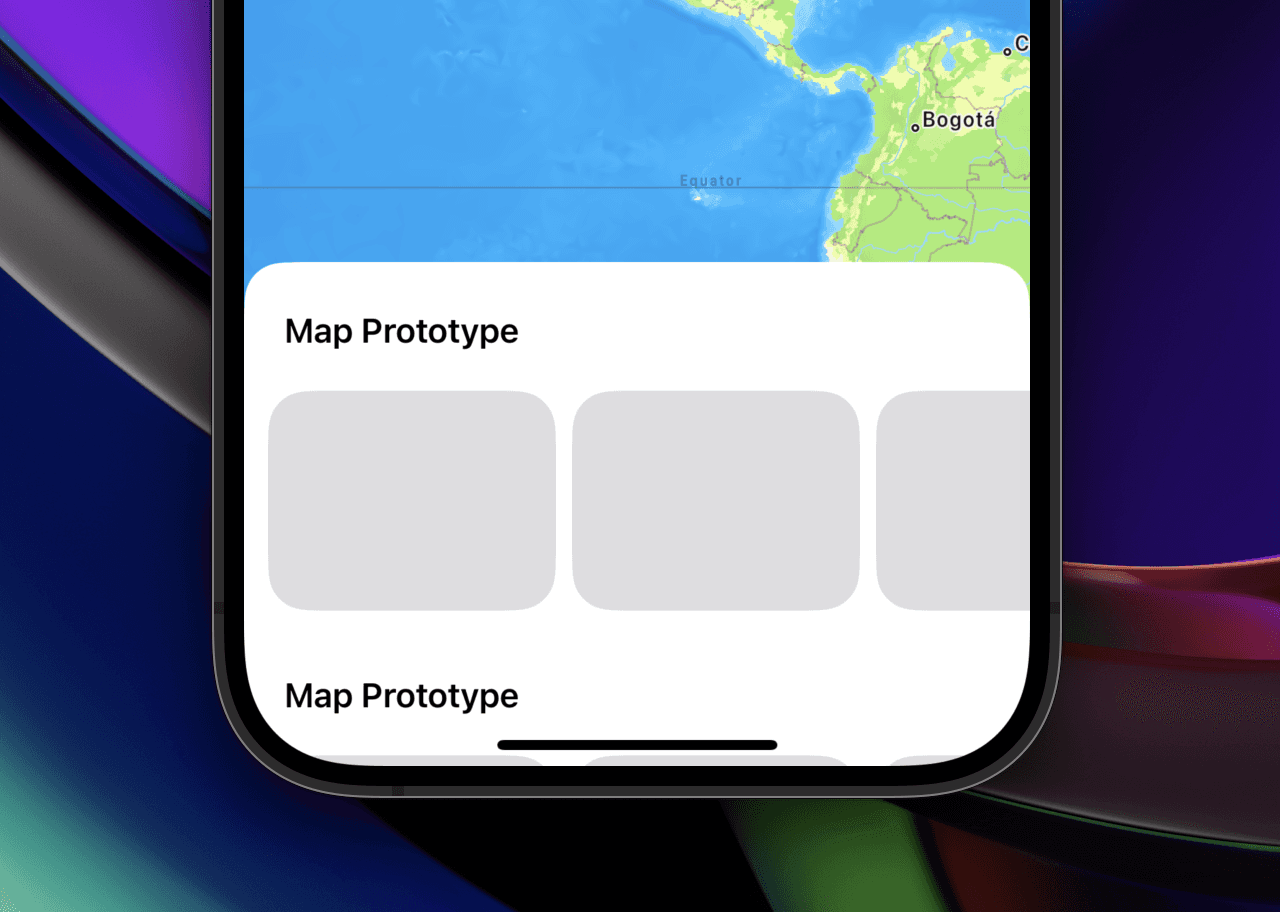
Creating Sheet is a simple task if you know how to create Stacks in SwiftUI. You are basically creating stacking object either horizontally, vertically or in z-axis. Size is automatically adjusted by SwiftUI unless you specify. And you can put them in the scrollview to make it scroll.
I basically created bunch of HStacks (carousel) and Stacked them vertically with headers. You can adjust padding and fill the empty space with spacer. I then attached the same drag gesture handler in the highest view that consists this panel.
Passing the value
Now, I need to make things move as I drag this panel up and down, the core concept of this prototype. In order to do this, I need to create variables that can store certain values and pass them across the View. This time, they were size of the map and position of it.
@State private var mapOffset = CGPoint(x:0,y:0)
@State private var mapHeight : CGFloat = 560
@State private var panelOffset = CGPoint(x:0,y:0)
And now it'll be changed as I define these during drag gesture and the end of it.
ZStack{...}
.gesture (
  DragGesture()
    .onChange { value in //Triggered during the drag.
        panelOffset = value.translation
        mapHeight = value.translation
        mapOffset.y = value.translation
    }
    .onEnded { value in //Triggered after the drag is ended.
        mapHeight = 320
        mapOffset.y = -300
    }
  )
Now the map moves as you drag the panel, but it won't move as you imagined. It basically maps to the value of the panel so it jumps around from its original position. This panel movement should be transmitted to somewhere and re-translated to values that will work with Maps module.
Mapping the range
This might be one of the most used formula when you prototype mobile UI - people typically call this as mapRange, but you can name however you want. Framer (Classic) even supported this as one of predefined modules and many other prototyping tools do as well.
It's basically this simple function, that translate a certain value in a specific value range to another range of values. You don't need to understand the mathematics of it. If you use Google Sheet or Excel, you might also have used this function already. So you can probably copy and paste, or register this as a Code Snippet (this is actually quite helpful!) and use whenever you need it. Here's a sample code.
func mapRange(value:CGFloat, inMin:CGFloat, inMax:CGFloat, outMin:CGFloat, outMax:CGFloat) -> CGFloat {
    return ((value - inMin) * (outMax - outMin) / (inMax - inMin) + outMin)}
So what you do know is basically convert the value from the gesture event and set in specific value range, something like this. Now panel height is more predictably changing - we're almost there.
//Simplified
  DragGesture()
    .onChange { value in //Triggered during the drag.
        panelOffset = value.translation
        mapHeight = mapRange(value:value.translation, inMin:0,inMax:-300,outMin:680,outMax:240)
        mapOffset.y = value.translation
    }
    .onEnded { value in //Triggered after the drag is ended.
        mapHeight = 240
        mapOffset.y = -300
    }
  )
And lastly, you can animate things when gesture is ended so that when you released your finger, everything moves more smoothly and hopefully in a delightful way. For this, you need to set a condition.
//Simplified
    .onEnded { value in //Triggered after the drag is ended.
        if value.translation < -120 {
            withAnimation(.spring()){
              mapHeight = 240
              mapOffset.y = -300
              }
      } else {
            withAnimation(.spring()){
              mapHeight = 240
              mapOffset.y = -300
              }
      }
    }
This is basically saying "when you dragged more than 120 pt vertically upwards, then trigger this animation, otherwise, trigger this other animation." Which is a pretty straightforward if-else statement. I think a lot of prototypes can be achieved with this combo. Obviously 120 pt was something I just came up with, I actually think prototyping allows us to tinker and really fine tune experience all the way down to specific vertical travel. This is somewhat lost in translation or overly simplified / misunderstood if you just show someone a video. Also you get to know what is the "right value".
I was able to prototype this with the help of chatGPT, Gemini Advanced - going to need a whole new journal entry but here's my LinkedIn post for the gist of it.
Going forward, I'll continue sharing some of my latest exploration, struggle, some examples as I learn SwiftUI and Designing with Xcode. Hope this was helpful.
If you're interested in trying this out and tinker with the actual code, here's full project file on github. I abbreviated a little bit in my article (eg. how to enable smooth translation when there's already default offset value) so you'll find a little more there.
Helpful links
Now, I'm going back to this very prototype that I started. Which is based on my frustration on Maps app that it loses locational context as soon as user starts engaging with the suggested contents. I learned how to create a map and how to create an object and make it draggable - time to connect dots.
Creating Sheet
Creating Sheet is a simple task if you know how to create Stacks in SwiftUI. You are basically creating stacking object either horizontally, vertically or in z-axis. Size is automatically adjusted by SwiftUI unless you specify. And you can put them in the scrollview to make it scroll.
I basically created bunch of HStacks (carousel) and Stacked them vertically with headers. You can adjust padding and fill the empty space with spacer. I then attached the same drag gesture handler in the highest view that consists this panel.
Passing the value
Now, I need to make things move as I drag this panel up and down, the core concept of this prototype. In order to do this, I need to create variables that can store certain values and pass them across the View. This time, they were size of the map and position of it.
@State private var mapOffset = CGPoint(x:0,y:0)
@State private var mapHeight : CGFloat = 560
@State private var panelOffset = CGPoint(x:0,y:0)
And now it'll be changed as I define these during drag gesture and the end of it.
ZStack{...}
.gesture (
  DragGesture()
    .onChange { value in //Triggered during the drag.
        panelOffset = value.translation
        mapHeight = value.translation
        mapOffset.y = value.translation
    }
    .onEnded { value in //Triggered after the drag is ended.
        mapHeight = 320
        mapOffset.y = -300
    }
  )
Now the map moves as you drag the panel, but it won't move as you imagined. It basically maps to the value of the panel so it jumps around from its original position. This panel movement should be transmitted to somewhere and re-translated to values that will work with Maps module.
Mapping the range
This might be one of the most used formula when you prototype mobile UI - people typically call this as mapRange, but you can name however you want. Framer (Classic) even supported this as one of predefined modules and many other prototyping tools do as well.
It's basically this simple function, that translate a certain value in a specific value range to another range of values. You don't need to understand the mathematics of it. If you use Google Sheet or Excel, you might also have used this function already. So you can probably copy and paste, or register this as a Code Snippet (this is actually quite helpful!) and use whenever you need it. Here's a sample code.
func mapRange(value:CGFloat, inMin:CGFloat, inMax:CGFloat, outMin:CGFloat, outMax:CGFloat) -> CGFloat {
    return ((value - inMin) * (outMax - outMin) / (inMax - inMin) + outMin)}
So what you do know is basically convert the value from the gesture event and set in specific value range, something like this. Now panel height is more predictably changing - we're almost there.
//Simplified
  DragGesture()
    .onChange { value in //Triggered during the drag.
        panelOffset = value.translation
        mapHeight = mapRange(value:value.translation, inMin:0,inMax:-300,outMin:680,outMax:240)
        mapOffset.y = value.translation
    }
    .onEnded { value in //Triggered after the drag is ended.
        mapHeight = 240
        mapOffset.y = -300
    }
  )
And lastly, you can animate things when gesture is ended so that when you released your finger, everything moves more smoothly and hopefully in a delightful way. For this, you need to set a condition.
//Simplified
    .onEnded { value in //Triggered after the drag is ended.
        if value.translation < -120 {
            withAnimation(.spring()){
              mapHeight = 240
              mapOffset.y = -300
              }
      } else {
            withAnimation(.spring()){
              mapHeight = 240
              mapOffset.y = -300
              }
      }
    }
This is basically saying "when you dragged more than 120 pt vertically upwards, then trigger this animation, otherwise, trigger this other animation." Which is a pretty straightforward if-else statement. I think a lot of prototypes can be achieved with this combo. Obviously 120 pt was something I just came up with, I actually think prototyping allows us to tinker and really fine tune experience all the way down to specific vertical travel. This is somewhat lost in translation or overly simplified / misunderstood if you just show someone a video. Also you get to know what is the "right value".
I was able to prototype this with the help of chatGPT, Gemini Advanced - going to need a whole new journal entry but here's my LinkedIn post for the gist of it.
Going forward, I'll continue sharing some of my latest exploration, struggle, some examples as I learn SwiftUI and Designing with Xcode. Hope this was helpful.
If you're interested in trying this out and tinker with the actual code, here's full project file on github. I abbreviated a little bit in my article (eg. how to enable smooth translation when there's already default offset value) so you'll find a little more there.
Helpful links