Recreating Threads Golden Ticket
I'm on a hunt to find something to play with SwiftUI these days. It's like I'm playing JRPG game and trying to level myself up to beat the boss (don't know what this would mean in my journey though). And I stumbled upon this interesting talk by Tim Oliver from Threads team - explaining how he created Threads golden ticket for iOS. Genuinely fun talk so highly recommend to check out.
This felt like a good challenge for me, for couple of reasons :
I absolutely love these kind of design details. Especially hologram effect reacting to light.
I absolutely don't know how to make it - so finding out how will give me a lot of knowledge along the way.
Even though I don't know how to make it, this is not building entire app. So felt like a good amount of scope for me.
Tim built it with UIKit I don't know anything about UIKit yet, so I decided to recreate this with SwiftUI. More and more I dive deeper with this - I get this urge to learn UIKit more. Even to my shallow knowledge, SwiftUI felt bit limiting when it comes to fully control animation and transition. But with this challenge I'll know how limiting it'll be or I little I knew about its capability.
Beyond 180
The first thing I did was making a card. And have it rotating. This felt pretty easy to me. What you need to do is basically draw a card and then add rotation3DEffect to rotate it. Another simple trick was show / hide front and back based on angle during rotation. You would want to change visibility at 90 degrees to ensure smooth transition.
Since this version was only rotating within 180 degrees, I needed to make couple of changes. a) It needed to rotate based on interaction just like the actual example from Tim and b) it needed to animate it beyond 180 degrees. 360 or just go higher based on things like velocity.
This was most challenging part for me overall because I needed to find out exact logic to enable show/hide in every 90 degrees - which actually turned out to be not true. In reality, the front of card will only be visible in first 90 degrees, then after that the back of card is visible next 180 degrees, then next 180 for the front and so forth.
I tried to figure out the equation but all I could think of was some static logics that won't scale - so it'll break beyond 720 degrees or something - beyond what I manually set up. So I asked ChatGPT and it gave me the function perfectly works for this case :
private func checkValue(v: CGFloat) -> Bool {
  if v < 90 { //Iniital 90 degree case
    return true
    } else {
    //Calculate the phase within the 180-degree intervals
    let phase = Int(v-90) / 100 % 2
    return phase == 0
  }
}
This function returns Bool for me to show/hide the front and back of the card. I might eventually figure out this logic but the fact it can create a function on my prompt was just mind blowing. And this is outcome of it. I also used Wave by Janum Trivedi to make things more interruptible and smooth. I didn't end up leveraging a lot of it but the fact I can manipulate the progress was quite helpful. Actually understanding and trying out Wave was one of my other plans with this prototype too.
Adding visuals
Even though animation above was quite bare bone, I thought all the hard parts were done with this prototype. Next thing was just adding visual effect that moves with the values that I'm getting from this rotation animation. This way of thinking is probably helpful when you make prototype with any other tools. Most visually relevant too might be Origami since it visually shows how values are passed to UI elements, which is very cool and nice with the caveat of visual complexity.
Couple of key components that I added here (following Tim's walkthrough) were following :
Basic lighting effects that moves with rotation value (changing offset)
LinearGradient that creates faux hologram / sticker effect
Bunch of icons to mask that gradient
What I did was basically listening to progress value that generated from Wave. Like I said, I couldn't really fully leverage its capability but this one was super helpful and I probably couldn't enable this transition with basic SwiftUI code myself. This is how I did :
progressAnimator.valueChanged = { value in
    self.progress = value //raw value that I got from progressAnimator (0-1)
    let anchorvalue = mapValueToRange(v: value*360) // custom function that I created to mapValue
//converting offsetvalue from the value
    offset = convertRange(value: anchorvalue, minvalue: 0, maxvalue: 1, minrange: -120, maxrange: 120,clipped: false)
    if value*360 < 90 { //dimming the card initially
        dimmer = convertRange(value: abs(anchorvalue), minvalue: 0, maxvalue: 0.15, minrange: 0, maxrange: 0.15,clipped: false)
      } else {
        dimmer = 0.15
      }
      let angle = abs(value*360)
      isFlipped = flipTheCard(v: angle) //Fliping front and back
      }
}
Now, all of the visual effects would nicely move based on animation progress and flip based on rotation value. Resulting nice animation like below :
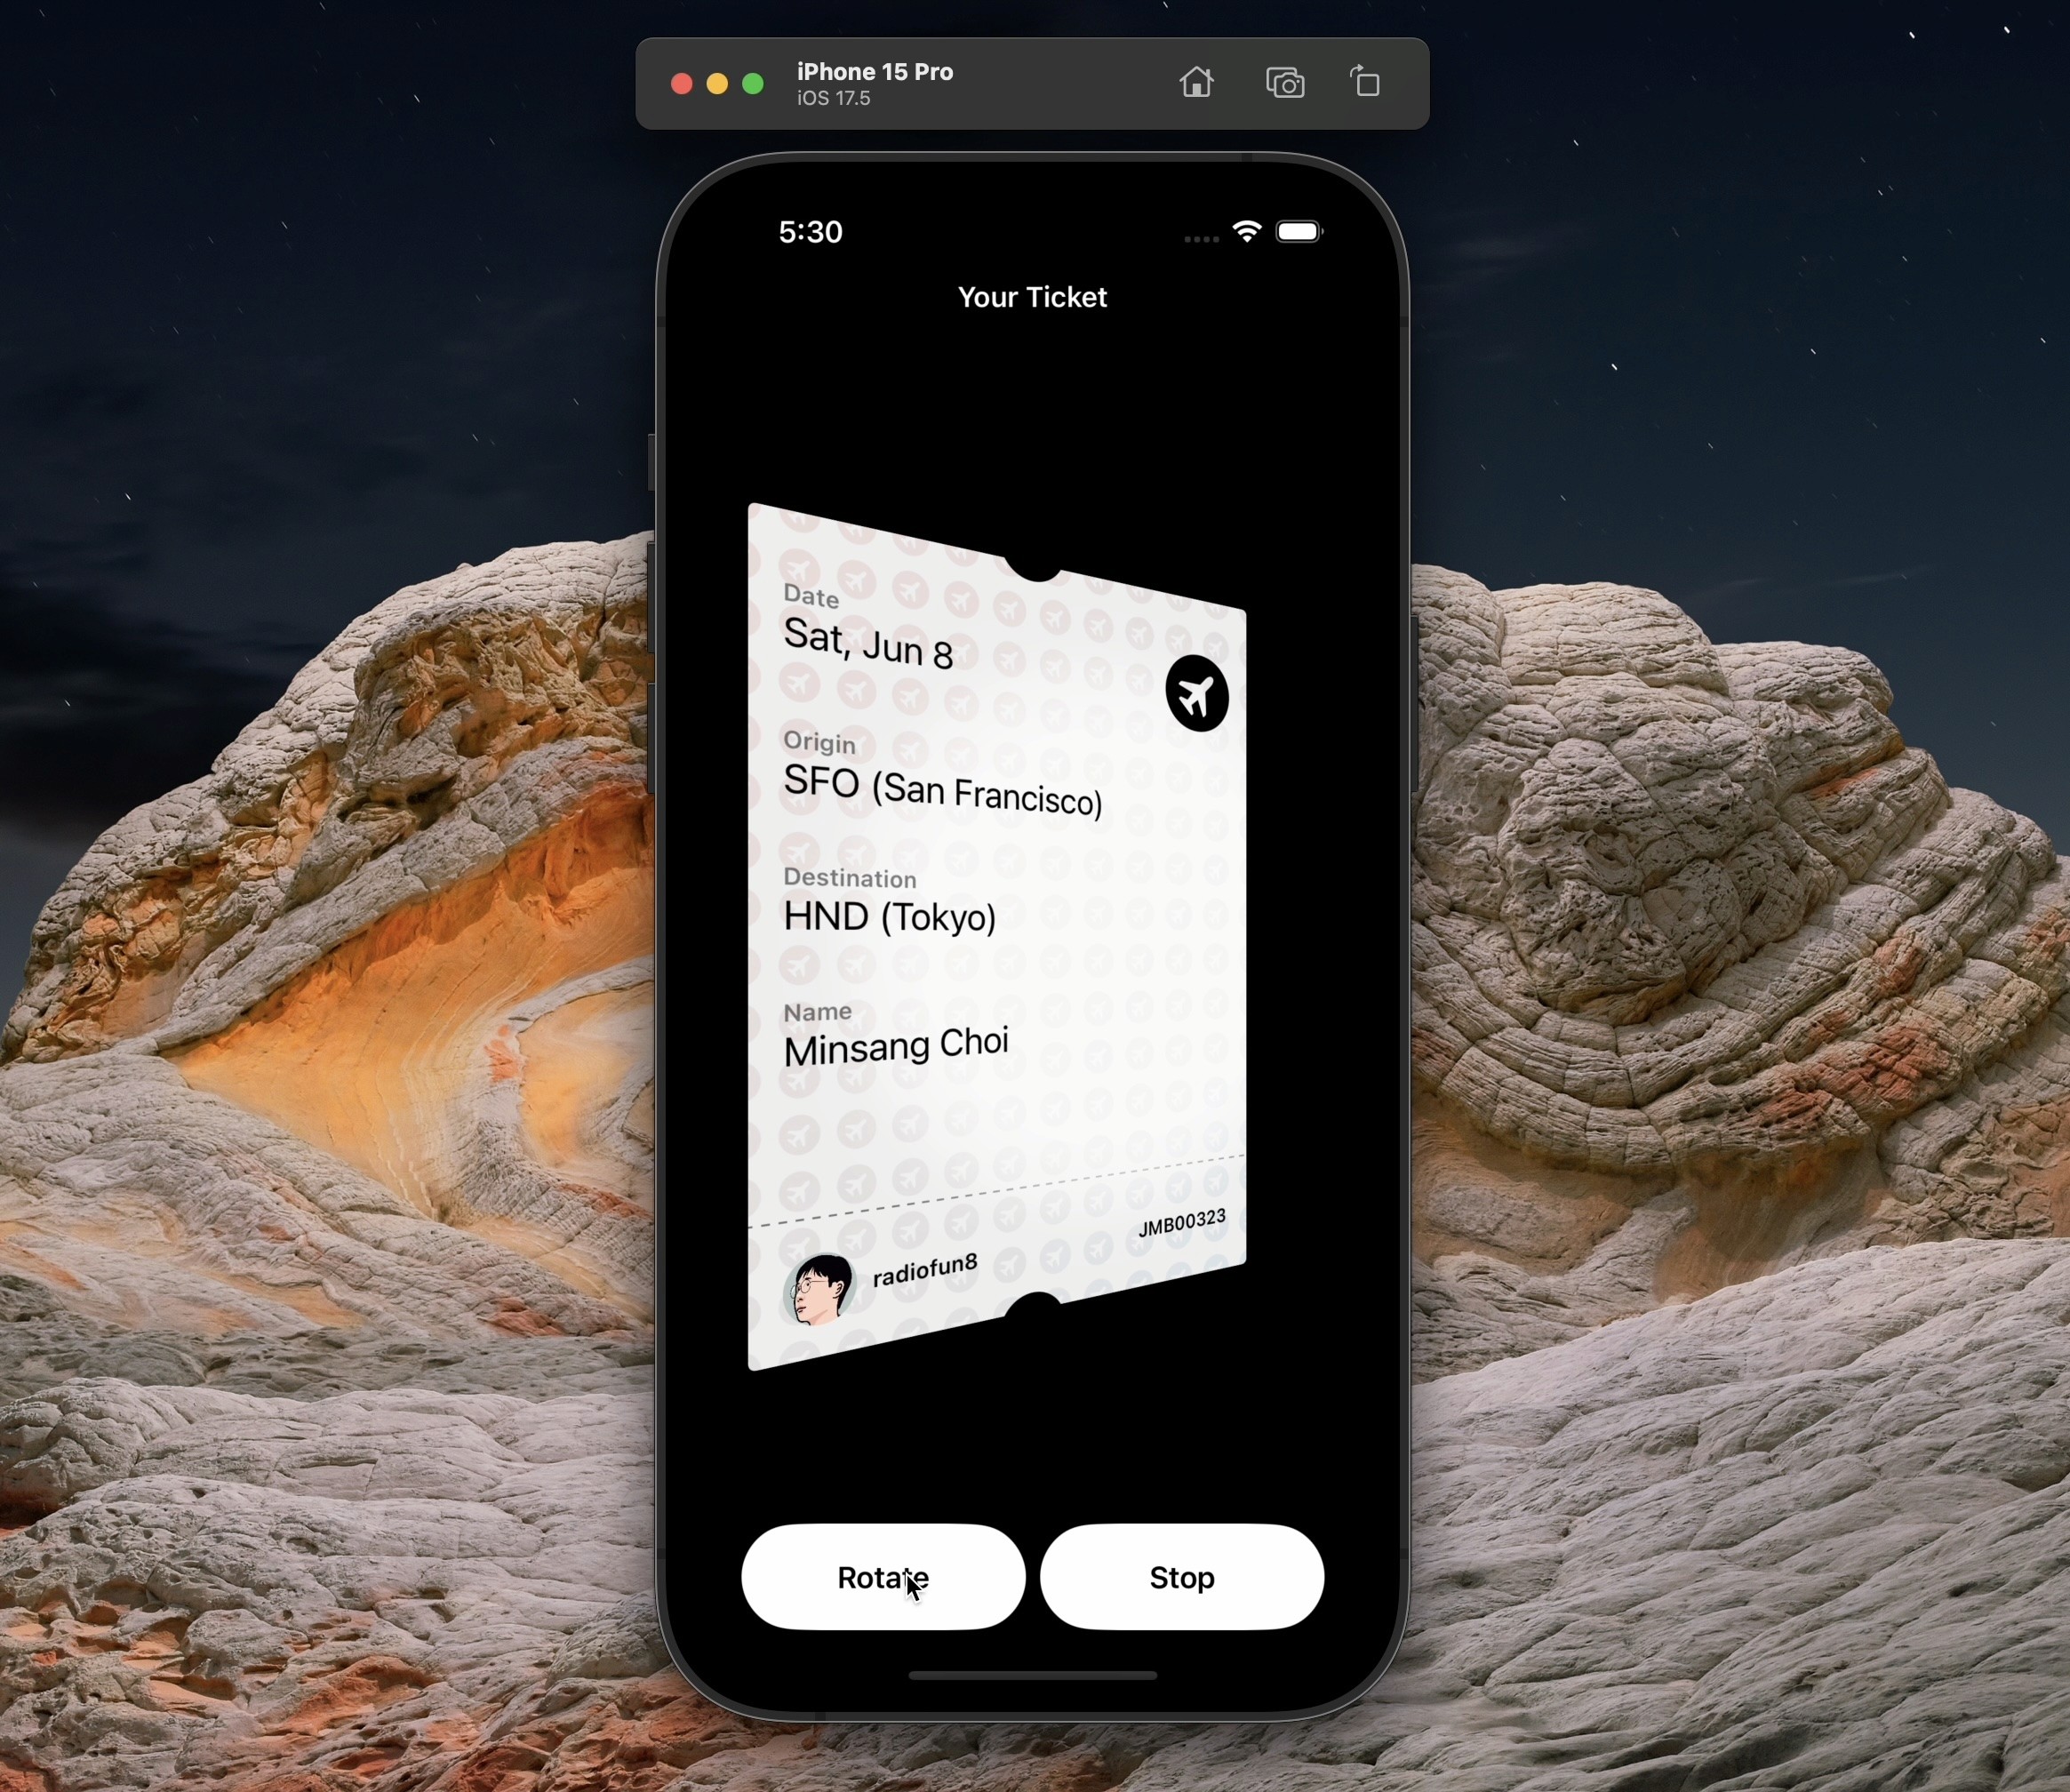
In the end, I didn't create exactly same UI (didn't want to unnecessarily use Threads branding etc) so just gave a little twist to make it look like a flight ticket. So just some fun details like Origin and Destination using bunch of layout features. Last thing that I tried to figure out was cutout, after a quick research I ended up using .blendMode(.destinationOut) and it created nice cutout effect to add a finishing touch.
It felt really good to try something felt challenging and even though it was not perfect, somehow figure out and overcome that hump. Shout out to Tim for sharing inspiring example and Janum for awesome package.
If you're interested in, here's SwiftUI code that you can download :
Also useful resources :
I'm on a hunt to find something to play with SwiftUI these days. It's like I'm playing JRPG game and trying to level myself up to beat the boss (don't know what this would mean in my journey though). And I stumbled upon this interesting talk by Tim Oliver from Threads team - explaining how he created Threads golden ticket for iOS. Genuinely fun talk so highly recommend to check out.
This felt like a good challenge for me, for couple of reasons :
I absolutely love these kind of design details. Especially hologram effect reacting to light.
I absolutely don't know how to make it - so finding out how will give me a lot of knowledge along the way.
Even though I don't know how to make it, this is not building entire app. So felt like a good amount of scope for me.
Tim built it with UIKit I don't know anything about UIKit yet, so I decided to recreate this with SwiftUI. More and more I dive deeper with this - I get this urge to learn UIKit more. Even to my shallow knowledge, SwiftUI felt bit limiting when it comes to fully control animation and transition. But with this challenge I'll know how limiting it'll be or I little I knew about its capability.
Beyond 180
The first thing I did was making a card. And have it rotating. This felt pretty easy to me. What you need to do is basically draw a card and then add rotation3DEffect to rotate it. Another simple trick was show / hide front and back based on angle during rotation. You would want to change visibility at 90 degrees to ensure smooth transition.
Since this version was only rotating within 180 degrees, I needed to make couple of changes. a) It needed to rotate based on interaction just like the actual example from Tim and b) it needed to animate it beyond 180 degrees. 360 or just go higher based on things like velocity.
This was most challenging part for me overall because I needed to find out exact logic to enable show/hide in every 90 degrees - which actually turned out to be not true. In reality, the front of card will only be visible in first 90 degrees, then after that the back of card is visible next 180 degrees, then next 180 for the front and so forth.
I tried to figure out the equation but all I could think of was some static logics that won't scale - so it'll break beyond 720 degrees or something - beyond what I manually set up. So I asked ChatGPT and it gave me the function perfectly works for this case :
private func checkValue(v: CGFloat) -> Bool {
  if v < 90 { //Iniital 90 degree case
    return true
    } else {
    //Calculate the phase within the 180-degree intervals
    let phase = Int(v-90) / 100 % 2
    return phase == 0
  }
}
This function returns Bool for me to show/hide the front and back of the card. I might eventually figure out this logic but the fact it can create a function on my prompt was just mind blowing. And this is outcome of it. I also used Wave by Janum Trivedi to make things more interruptible and smooth. I didn't end up leveraging a lot of it but the fact I can manipulate the progress was quite helpful. Actually understanding and trying out Wave was one of my other plans with this prototype too.
Adding visuals
Even though animation above was quite bare bone, I thought all the hard parts were done with this prototype. Next thing was just adding visual effect that moves with the values that I'm getting from this rotation animation. This way of thinking is probably helpful when you make prototype with any other tools. Most visually relevant too might be Origami since it visually shows how values are passed to UI elements, which is very cool and nice with the caveat of visual complexity.
Couple of key components that I added here (following Tim's walkthrough) were following :
Basic lighting effects that moves with rotation value (changing offset)
LinearGradient that creates faux hologram / sticker effect
Bunch of icons to mask that gradient
What I did was basically listening to progress value that generated from Wave. Like I said, I couldn't really fully leverage its capability but this one was super helpful and I probably couldn't enable this transition with basic SwiftUI code myself. This is how I did :
progressAnimator.valueChanged = { value in
    self.progress = value //raw value that I got from progressAnimator (0-1)
    let anchorvalue = mapValueToRange(v: value*360) // custom function that I created to mapValue
//converting offsetvalue from the value
    offset = convertRange(value: anchorvalue, minvalue: 0, maxvalue: 1, minrange: -120, maxrange: 120,clipped: false)
    if value*360 < 90 { //dimming the card initially
        dimmer = convertRange(value: abs(anchorvalue), minvalue: 0, maxvalue: 0.15, minrange: 0, maxrange: 0.15,clipped: false)
      } else {
        dimmer = 0.15
      }
      let angle = abs(value*360)
      isFlipped = flipTheCard(v: angle) //Fliping front and back
      }
}
Now, all of the visual effects would nicely move based on animation progress and flip based on rotation value. Resulting nice animation like below :
In the end, I didn't create exactly same UI (didn't want to unnecessarily use Threads branding etc) so just gave a little twist to make it look like a flight ticket. So just some fun details like Origin and Destination using bunch of layout features. Last thing that I tried to figure out was cutout, after a quick research I ended up using .blendMode(.destinationOut) and it created nice cutout effect to add a finishing touch.
It felt really good to try something felt challenging and even though it was not perfect, somehow figure out and overcome that hump. Shout out to Tim for sharing inspiring example and Janum for awesome package.
If you're interested in, here's SwiftUI code that you can download :
Also useful resources :